our first DIY project
Matt and I tackled our first DIY project for Oliver's nature themed nursery today. Nothing major, but a project for baby nonetheless.
I'm sure you've seen the wooden letters covered in scrapbook paper. Well, I think they are super cute and because all it takes is some mod podge and the scrapbook paper of your choosing it seemed simple enough.
It wasn't too hard, but I've learned to never expect something to turn out like it looks in the picture on Pinterest. Ha!
Anyway, it turned out great and my husband was a champ for helping me by trimming all the paper around the letters. Here are some pictures...
I'm pleased with how they turned out! Working together on it was also fun and it sparked some conversation about what we want the nursery to look like. Looking forward to actually getting to set it up!
I'm sure you've seen the wooden letters covered in scrapbook paper. Well, I think they are super cute and because all it takes is some mod podge and the scrapbook paper of your choosing it seemed simple enough.
It wasn't too hard, but I've learned to never expect something to turn out like it looks in the picture on Pinterest. Ha!
Anyway, it turned out great and my husband was a champ for helping me by trimming all the paper around the letters. Here are some pictures...
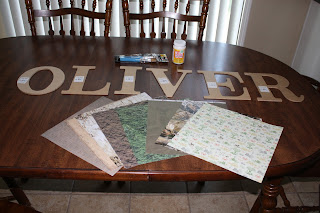
Supplies:
bottle of Mod Podge, foam brush, letters,
scrapbook paper, and a box cutter
 |
| before |
What to do:
- Trace each letter on the paper (if you trace it on the back make sure to flip it so that it looks right when you turn it over)
- Coat each letter with mod podge (one at a time)
- Attach the paper to the letter
- Remove excess paper (we used a box cutter)
- Coat each letter with another layer of mod podge
 |
| after |
O: birch tree bark
L: grass
I: owls, trees, birds, baby deers
 |
| after |
V: camo
E: straw
R: a buck and baby deer
 |
| after |

Comments
Post a Comment